Monthly Archives: May 2015

Memorial Day 2015 …

Memorial Day was borne out of the Civil War and a desire to honor our dead. It was officially proclaimed on 5 May 1868 by General John Logan, national commander of the Grand Army of the Republic. “The 30th of May, 1868, is designated for the purpose of strewing with flowers, or otherwise decorating the graves of comrades who died in defense of their country during the late rebellion, and whose bodies now lie in almost every city, village and hamlet churchyard in the land,” he proclaimed. The date of Decoration Day, as he called it, was chosen because it wasn’t the anniversary of any particular battle.

copyright 2013
The Civil War Monument in Morristown, New Jersey was dedicated in 1871 to the soldiers and sailors of the Civil War.
100_6378

 Take a moment to remember the original reason for Memorial Day and the men and women who gave their lives for our country.

Have a great Memorial Day and enjoy the weekend whatever you’re doing.

101_4912


Weekly Challenge: Broken …

The challenge this week is to show something broken.

 My picture is of the broken glass in my sliding glass door.

100_8037
100_8040


https://dailypost.wordpress.com/dp_photo_challenge/something-broken/


Make Mine a Mini, Workflow

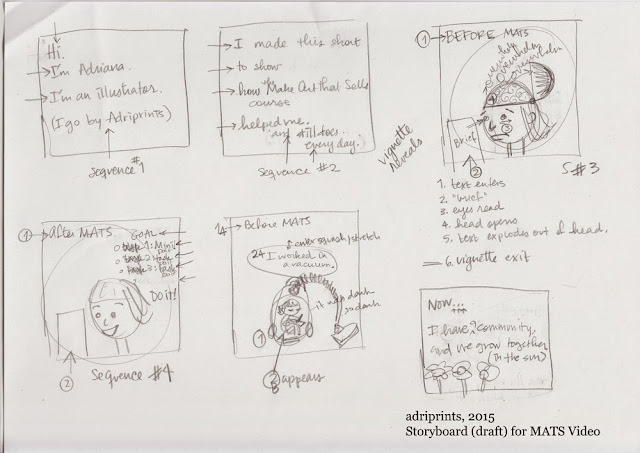
Previously, I posted this animated short featuring my illustrations.  In this post, I wanted to share my workflow in After Effects so that I could easily reference what I did, what I learned, and what I think could improve in my workflow moving forward.  This post is also to help my illustration friends who might want to try it, too!

Workflow #1
for the first half of the short
the "overwhelm" sequence

1. Complete final sketch for placement of all items

2. I used a light table to illustrate various elements of the final image in pen & ink individually (so they're not touching or overlapping).


Inked text and brain for final animation.
3- Scan and make a vector composition (placement of all assets/icons) use sketch for reference.

NOTE: Everything that you want to animate individually, needs to be on its own layer (head vs. top of head in my case) and use an artboard that is the size of your final screen to help with proportion.  You don't wanna draw in After Effects.  It's clumsy, and on my computer it's so huge it time-lags to do anything.

4- Bring illustrated assets into project panel of After Effects (file> Import, x-retain layer size> Import)
5- Make a new composition (ctrl+n) at the desired length and specs.
6- Drag your file from the project panel to the timeline area.
7- Convert your file from vector to shape layer (right-click layer in timeline> convert to shape layer)

NOTE: This will explode into 200+ layers in After Effects if you're a rough-line illustrator like me. It's okay.  We will get through this.  If you're a super-clean vector illustrator it's even easier-- also maybe look at Flash as a simpler solution than AE.

8- Carefully separate layers into groups (took a long time with such tiny pieces in my artwork).
9- Then form groups into Pre-Comps (mini animation canvases).  Assign the anchor point to the right part of each element (Y).  Make sure all elements are where you want them to be at the end.
10- ANIMATE!


Tips on Animation
  • Let your storyboard be your guide.
  • Work backward from your storyboard key images.
  • I think about the biggest movements and mark where I want those actions to hit on the timeline using the markers.
  • It's easier if you already have music to match the movement.
  • Then, I work between the markers.  I go through each pre-comp to animate each item individually, then as a group, and lastly, each section until satisfied.
  • To export hit Ctrl+m to render queue and click"render".
  • Lastly, I put the rendered clips together in MovieMaker... You do not want to do any real editing in MovieMaker so be sure your clip is the approximate right length, your transition in and out is the way you want it to look, and that your text is the correct size. Windows Movie Maker is really easy to use, but you cannot control details very well.


Workflow #2
for the second half of the short
the "ibis hideaway" sequence (as shown above)

1- Used my final pattern "Ibis Hideaway" as layout for my final composition
2- separated each layer (30+) into .png files with transparency exported from Illustrator

Note: I preserved the artboard size for each item.  I thought this would help with placement in AE and it did, but it makes anchor points really critical and you can't use the shotcut "ctrl+alt+home" to automatically center the anchor point for each object b/c it's the size of the artboard. Plus it's annoying to select items when you do this.  But, I did like that it created a more manageable series of layers and pre-comps.

See what I mean about preserving the artboard?

3- In AE, import files into the Project Panel and make a new composition.
4- Drag your files from the project panel to the timeline area.

5- Form layers into groups (took a long time with such tiny pieces in my artwork).
6- Then form groups into Pre-Comps (mini animation canvases).  Assign the anchor point to the right part of each element (Y).  Make sure all elements are where you want them to be at the end.
7- ANIMATE!

- - - -
I asked Jake Bartlett of the "Animating With Ease" Skillshare Class about his workflow after he's done animating, and here's what he had to say:
...I use Adobe Premiere for all of my editing needs. It works wonderfully with all of the other Adobe products and is extremely robust. For still titles, I use the built in title maker, and for anything animated or more designed, I'll use AE or Illustrator. The workflow depends on the project, but if I'm animating to music or a VO track I typically will edit the audio first in Premiere, and then copy and paste the audio clips directly from my Premiere sequence into a composition in After Effects. That way I have the audio reference inside AE while I'm animating. Hope that helps!
Thoughts, Questions, etc.

Moving forward, I liked the simplicity of the second workflow.  Pre-grouping the elements that I knew were not going to need individual animation saved me a lot of time.  It sacrificed control, and in some cases visual quality - one of the butterflies came in pixelated and I don't know why. I must not have used the same settings as with the other .png files.

If I do a character or puppet animation I would need to export each element of the figure as a transparent .png illustrated in either PS or AI.  I think it could work, and then I'd use the anchor points like the hinges we made in paper animation!  So excited.

If you know of a better way to get raster or complex vector images into AE, or if I glaringly forgot or missed something, please do not hesitate to e-mail or comment and let me know.  I'm just getting into AE and would love to use my time as efficiently as possible so any advice is welcomed!

Wisteria On The Vineyard …

101_4652

101_4651

Oak Bluffs – Martha’s Vineyard


Finished: Amelia Dress

I have been relying on Neve to take my pictures of finished apparel since I haven’t got a remote for my camera.

Usually it turns out well.  She’s got a little work to do making sure she frames the shots right and doesn’t get me a totally unflattering angle (she likes to sit and shoot upwards at me, which tends to me me look super top-heavy).

Today we had a cute distraction, so it’s okay.

But first, the dress.  I used The Amelia Dress pattern from Green Bee Patterns (you should check out their other offerings; there’s some cute kid patterns!) which is a dress that uses regular woven cotton or linen, but is cut on the bias so it hangs in a more flattering and comfortable fashion.

For the fabric I chose “Sprinkles” in Indigo from Dear Stella.

I’ve made the dress once before and enjoyed both the project and the dress itself, so I thought I’d have another go at it.

05.19.15a

I super love it. Also, it’s 100 times more flattering in person. (and it’s got pockets!!!!!)

05.19.15b

(This is my “I’m going to move a bit to the left but oh are you still taking pics?” look.

I really like that that the fabric has a kind of universe/Doctor Who-y kind of feel about it.

Orzo really liked it, too. In fact, he showed his appreciation by rolling all around on the ground at Neve’s feet while she was supposed to be taking pictures of my dress.

05.19.15c

Which is how I wound up with many more pictures of him than me.

Oh well. Can’t argue with cute!

05.19.15e

05.19.15d

05.19.15f

Then she handed off the camera and cuddled him up.

In other news, the roses are blooming, and there’s a sweet little bird’s nest in one of the bushes!

05.19.15g

So far I haven’t seen any activity going on in it, but it’s still nice to see it there.

We’ve also been getting a respectable amount of strawberries out of the garden.

05.19.15h

So far we are getting a good handful every evening.  I haven’t been allowing them to spread so that they will focus their energy into berry production. I’ll stop picking off the feelers after the peak fruiting and next year we should be absolutely awash in strawberries!

05.19.15i


Tagged: Farm, food, Garden, Pets, Sewing

Lake Side …

IMG_0760

IMG_0759

Lake Mohawk … Sparta, New Jersey


Review: Increase Decrease

Review: Increase Decrease post image

99IncDec_012

First, the facts:

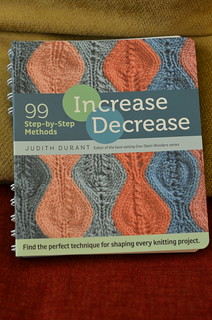
Title: Increase Decrease: 99 Step-by-Step Methods

Author: Judith Durant

Published by: Storey Publishing, 2015

Pages: 256

Type: How-to

Chapters:

1. Increase
(Neutral Increases; Right- and Left-Leaning Increases; Multiple-Stitch Increases; Centered Double Increases)
2. Decrease
(Single Decreases; Double Decreases; Multiple Stitch Decreases)
3. Combinations and Special Circumstances
(Increase and Decrease for Decorative Effect; Special Circumstances)

KS: Increase Decrease

The In-Depth Look:

Nobody can deny the usefulness of increases and decreases for knitting. Without them, the only thing any of us would be able to make would be variations on rectangles. Shaping is important! And so, all of us learned the basics–SSK and k2tog for decreases, and the M1 or kfb for increases, with yarn overs for when we felt like doing something fancy like lace.

And for some of us, that’s where we stopped. A couple methods for increasing, one left-leaning, one right-leaning decrease … what more does a knitter need?

Except … there are so many other options. Increases and Decreases that lean one way or another to make your work look nice and finished at the edges or symmetrical along a center point. There are methods that are meant to be seen and ones that are better off invisible. And so on.

The point is that–just like in so many other ways, knowledge is power, and knowing the various variations possible lets you make the smartest decisions when you knit.

Judith Durant has made this easy for you, though. She’s painstakingly gone through and documented ninety-nine possible methods of increases and decreases, just for you. Each one comes with clear, how-to photos along with explanations of the characteristics and uses for each one. Because, yes, you can theoretically go through your entire life knowing just one method for increasing stitches, but … isn’t it better to know the options?

So, the first two sections of the book focus on (1) increases and (2) decreases, broken down by neutral and leaning and methods that change the stitch count in multiples for when you need something centered or decorative. The third section addresses increases and decreases for special circumstances, like for color knitting, textures, or lace–not to mention decorative uses like in bobbles or ruching.

This book is handily spiral-bound so that it will stay open while you work. The background color of the pages is color-coded to make finding each section easier. There’s a full index to make it easier to find things.

Honestly, about the only thing I can think that’s missing here is addressing the needs for a Combination knitter whose purl stitches are oriented differently on the needle, but since those folks (which includes me) are a knitting subset, it’s reasonable to leave their particular requirements outside the purview of this specific book.

It’s a great book. Clear, helpful, well-organized, exhaustive, and full of really good illustrations. It’s also a handy size to tuck into your knitting bag and has that aforementioned spiral binding to make it as easy to use as possible.

You should definitely take a look, which you can do at Amazon.com or at a local shop.

Want to see bigger pictures? Click here.

This review copy was kindly donated by Storey. Thank you!

My Gush: Useful, thorough, and easy to use.

Make Mine a Mini

My first animated illustration in at least 7 years.


I made the video itself over a few days, but the artwork had already been through a storyboard, script, etc.  Honestly, I had too many ideas and now resort to watching my own video to avoid repeating my own mistakes!  The purpose of the video was to present our favorite lesson learned in the Make Art That Sells course.

Last time I did any sort of real animation was 7+ years ago through elective classes at RISD which I adored.  You can see it here if you're curious (the lady was my puppet).  And, while I'm parading my freak-flag, I might as well share my old animated .gifs which you can see here.  Those were done using Photoshop layers.  I blame my brother for that.  He got me into pixel art (you can see his work here & here -- he mainly works in 3D).  This time, though, after going through all the prep work: writing a script, drawing a storyboard, starting my illustrations, scanning them in, ready to start animating... I froze!  I psyched myself out!

I knew I needed to use something else to help me get the results I wanted because I wasn't going to do traditional animation.  I thought of using either Flash or After Effects, but it seemed like such a huge task.  I chose After Effects and started exploring it through various tutorials trying to chip away at it and taking the skills I needed to get the effect I wanted.

- - - -
Helpful Tutorials:

First, I started with the Adobe.TV tutorials here which are fine (a little dry, but efficient).

Then, I watched this tutorial series from Phil Ebiner on Skillshare called "Complete After Effects Course" to familiarize myself with the skeleton of the software.  These tuts run somewhat long and you can skip the first 15-30 seconds of each.  These could be condensed.  I recommend with reservations - pick and choose what skill you need to know more about.

Next, I watched Jake Bartlett's "Animating With Ease" Skillshare series and this is where the meat is.  He masterfully edits all the episodes into 100% content.  Have a notepad ready.  Have After Effects open in the background or separate screen.  Be ready to go.

For very specific tasks like the walk cycle or lip-syncing, I really like Fraser Davidson's tutorials also on Skillshare.  The "con" to the walk-cycle course is that he uses strokes to make the limbs.  This makes most people's projects from the class look very similar.  I do like his tutorial-style and he does illustrate the concepts clearly so they're still valuable.  Also, he's humorous and his tutorials are fun to watch which is often not the case with tutorials.

Also, I dedicated an entire post to sharing my workflow in detail in case you were interested!

Make Mine a Mini

My first animated illustration in at least 7 years.


I made the video itself over a few days, but the artwork had already been through a storyboard, script, etc.  Honestly, I had too many ideas and now resort to watching my own video to avoid repeating my own mistakes!  The purpose of the video was to present our favorite lesson learned in the Make Art That Sells course.

Last time I did any sort of real animation was 7+ years ago through elective classes at RISD which I adored.  You can see it here if you're curious (the lady was my puppet).  And, while I'm parading my freak-flag, I might as well share my old animated .gifs which you can see here.  Those were done using Photoshop layers.  I blame my brother for that.  He got me into pixel art (you can see his work here & here -- he mainly works in 3D).  This time, though, after going through all the prep work: writing a script, drawing a storyboard, starting my illustrations, scanning them in, ready to start animating... I froze!  I psyched myself out!

I knew I needed to use something else to help me get the results I wanted because I wasn't going to do traditional animation.  I thought of using either Flash or After Effects, but it seemed like such a huge task.  I chose After Effects and started exploring it through various tutorials trying to chip away at it and taking the skills I needed to get the effect I wanted.

- - - -
Helpful Tutorials:

First, I started with the Adobe.TV tutorials here which are fine (a little dry, but efficient).

Then, I watched this tutorial series from Phil Ebiner on Skillshare called "Complete After Effects Course" to familiarize myself with the skeleton of the software.  These tuts run somewhat long and you can skip the first 15-30 seconds of each.  These could be condensed.  I recommend with reservations - pick and choose what skill you need to know more about.

Next, I watched Jake Bartlett's "Animating With Ease" Skillshare series and this is where the meat is.  He masterfully edits all the episodes into 100% content.  Have a notepad ready.  Have After Effects open in the background or separate screen.  Be ready to go.

For very specific tasks like the walk cycle or lip-syncing, I really like Fraser Davidson's tutorials also on Skillshare.  The "con" to the walk-cycle course is that he uses strokes to make the limbs.  This makes most people's projects from the class look very similar.  I do like his tutorial-style and he does illustrate the concepts clearly so they're still valuable.  Also, he's humorous and his tutorials are fun to watch which is often not the case with tutorials.

Toddler Streaky Legs & Moneta

That felt really weird typing the title to this blog post, but yes, admittedly my son is now a toddler and most definitely not a squishy baby anymore!  I finally finished one of his "Streaky Legs" poofy pants this weekend!

The Facts
⁃ Fabric: <1m single jersey, <0.3m ribbing for cuffs
⁃ Pattern: Ottobre "Streaky Legs" pattern
⁃ Year: 2014?
⁃ Notions: waistband elastic
⁃ Time to complete: 1 day for tracing and cutting, an hour for sewing
⁃ First worn: May 16, 2015
⁃ Wear again?  He has no choice! hahah!
⁃ Mods? Nope, they fit great on him.

and I finished Moneta from Colette Patterns for me!


The Facts
⁃ Fabric: 3m soft interlock, maybe french terry in turquoise
⁃ Pattern: Colette Pattern 1028 Moneta
⁃ Year: 2014
⁃ Notions: Framilon clear elastic
⁃ Time to complete: 1 day for tracing and cutting, 1 day for sewing
⁃ First worn: May 17, 2015
⁃ Wear again?  YES!
⁃ Mods? Yes, I would like to make the shoulders wider so it doesn't fall off my shoulders... or expose my bra straps to everyone.