Tag Archives: Inspiration

Kansas Beeswax

I have mentioned a couple of time that I have been looking in to soap-making, though I seem to be doing most of my ruminating about that on twitter. While I am definitely interested in making soap, that’s not all I’m interested in creating. Learning about oils and herbs and essential oils easily leads from just soap to just overall natural body care.

kansas beeswax

One of the first things I wanted to try using was beeswax. It’s supposed to be very moisturizing and nutrient rich. I’m hoping to try it out in some body butter, some lip balm, and some soap.

Finding a good source for local beeswax is important, since beeswax isn’t really all that regulated in the US. While I still intend to ask around at the farmer’s market and with some local beekeepers, I was able to find a source for Kansas beeswax on etsy.

beeswax cubes
This beeswax came from Hutchinson. It’s golden, firm, and smells divine. Seriously, I wish I could give you this smell. If you weren’t careful, you could mistake it for toffee made with honey, because it certainly looks good enough to eat.

beeswax label
That’s why I’m making sure to store the beeswax in the labeled baggies. Aren’t those bees so happy and adorable?

As soon as my other supplies arrive, the creating shall commence.

Spinning Inspiration

Easter Egg Handspun2
Some of my handspun from last year.

It’s Tour de Fleece time, and again I am not officially participating. I haven’t spun since sometime last winter before I got too big to spin. My wheel is awfully neglected, but knitting on my pogona with handspun yarn has me yearning to spin all of the yarn I knit with. This is completely unrealistic with a newborn around, but a gal can dream.

When I feel the yearning to spin, but can’t quite find the time, I usually wind up browsing handspun available for sale on etsy. The selection is gorgeous–and knowing that I can also create such treasures motivates me to find the time to get my wheel out again. And every now and then, I snap up one of those treasures for myself.

Here’s what I’ve been admiring lately:

spinninginspiration1
This wool and silk blend from blarney yarn

spinninginspiration2
This bulky rainbow yarn from Wool Wench

spinninginspiration3
Pretty much everything from brand new shop Dotori Handmade is absolutely gorgeous.

spinninginspiration4
And these lovely singles from pancake and lulu.

3 Hours Past’s Blank Canvas Tee: Maternity Hack

During Me-Made-May 2014 I'd like to share some of the me-mades I've made in more detail.  In order to see if I could replicate a maternity/breastfeeding top that I love, I tried my hand at drafting and here are the results!


If you're just starting out sewing with knits, a great place to start is a simple dolman sleeved t-shirt like the Blank Canvas Tee from 3 Hours Past the Edge of the World's Blog.  If you're past that, are ready to try some drafting, and would like to make yourself a breastfeeding or maternity top, then this is the mod for you!

Start with the Blank Canvas Tee from 3 Hours Past...

Added Materials

  • additional fabric because the length of the T-shirt is extended.
  • 1 piece of elastic - soft baby elastic or elastic about 1/4" wide that suits your fancy in the width of your t-shirt + 2" or so.

Extra Skills

  • sewing with elastic

Special Tools

  • twin needle
  • stretch needle 75/11  (a whaah?  Here's a needle guide from Schmetz)
  • pencil and ruler
  • maybe tracing paper if you don't want to write on your pattern
Inspiration: From boob design, this short sleeve maternity/nursing top is one of my faves.  It fits really well and the split top allows for belly room.


Okay.  Ready to make your own?
First print and assemble your pattern pieces from 3 Hours Past... Then, here's our goal: we want to create two pieces for the front that overlap by around 5" / 13cm for the smaller sizes.  You'll likely need a bit more overlap for the larger sizes or if you usually find yourself doing large bust adjustments.

The goals.
Measure from just below the armpit curve to your goal overlap length, then add 1" / 2.5 cm so you have enough to turn up a hem.  Trace what you have onto your fabric, or onto tracing paper to make pattern pieces.  I've highlighted what I did to the pattern in the photo below.


See the red highlight?  That's the top front piece.  The blue highlight shows where the the bottom front piece would be.  For the bottom, I took the design line straight up and did not taper in like the pattern - it's housing a big belly at the moment, and I thought it would be advantageous to have a little leeway.

The other change I made here was adding length.  Add what you will.  My goal was to have a t-shirt around 28" so I added a few inches to the bottom of both the back and front bottom pieces to achieve that.  I just followed the design lines to my goal length. To calculate length, I measured from the peak of the shoulder, parallel to the fold line.

Alright, you've traced and cut your 3 pattern pieces.  Do you have your edging pieces (no change from pattern) cut, too?  And those two strips of interfacing for the shoulders?  What interfacing? I used Vlieseline G785 since it's stretchy, lightweight, and works with knits. Everything cut? Great! Let's get these pieces ready to put together.

Assembly:

  1. Step 2 from pattern: Iron on interfacing to WS of back piece shoulder edges
  2. Front top piece - finish bottom edge with zig zag stitch or serge, turn up and twin needle the hem from the right side
  3. Front bottom piece - add elastic to top RS edge using a triple zig-zag stitch.  How?  I simultaneously slightly stretch the elastic while guiding the main fabric under the presser foot.  I do not stretch the main fabric.  Right hand for elastic, left hand for guiding fabric.  I do this 2" at a time so I don't lose my nerve.  Then, I fold over the elastic so I only see the final fabric, and straight stitch the bottom edge of the elastic.
  4. Overlap the two front pieces- With RS facing you, make sure the front top is on top, and the front bottom is behind it.  Make sure the overlap is what you desire and pin.  Stay stitch within the seam allowances (so ~1/8" from the edge) to secure the overlap.
  5. Step 3 to 9 are the same as the original pattern.
And there you have it!  You've made a maternity/breastfeeding t-shirt!  Feel free to change the neckline and make it a scoop neck like in the inspiration photo.  I like crew necks so I kept the pattern as is.  But, I think I'm going to try and make a tank or sleeveless v-neck.  We shall see!

Repeating Words …

I’m repeating this post from last January because it did inspire and encourage me.

*~~~~~~~~~~~~~~~~~~~~~~~~~~~~~~~~~~~~~~~~~~~~~~~*

Everywhere you look this time of year there are words of encouragement, hope, and inspiration to help you along with those pesky new year’s resolutions so many of us fail to keep. We all know the sayings and catch phrases and remember them at least for awhile.

And then the other day I saw this card… it jumped right out at me… I read it… liked what it said and put it back. Then picked it up again. Put it back and walked away. It pulled me back and it was obvious I wasn’t leaving the store without it.

It’s not just the words, I like the colors, the contented look on the woman’s face.. peaceful and all knowing without being all preachy about it.

100_3033

Some of these things will be easy to embrace, others not so much.

*Embrace change –- Never an easy thing for me, I usually like things the way they are and fight against too much change… some would say all change but I disagree, I’m trying to accept some change.

*Take the journey back to yourself –- Ahhh, it’s so easy to lose the ‘self’ we are, the one that is inside our heads talking to us. We lose ourselves and become someones mother, wife, sister, friend… the essence of our inner self gets overshadowed. I am definitely encouraging my inner self to stand out and up more often.

*Speak of gratitude –- I am grateful and do speak of it often and hope that it comes through to those I am grateful to, and for.

*Wear yellow shoes — Here’s one I’m looking forward to. I used to have yellow heels and yellow patent leather flats and they made me happy. They say you should always have a pair of red shoes and I agree with that, but yellow, now there’s a pair of shoes to dance among the stars in.  (Never got yellow shoes but I got ones with stars on them)

*Unleash your creative spirit –I do unleash my creative spirit… here are two examples… this blog…and my photography blog

http://throughjerseyeyes.com/

*be positive – I’m not generally, I am a pessimist with optimistic leanings but I shall endeavor to switch that around. Really, I’m positive about that !

*Believe in healing — Definitely, no doubt about it…mentally, physically and spiritually.. we can heal.

*Share your inner light — I try to do that,  a smile here, a smile there, it’s amazing how many people react positively to that… see, I’m being positive :)

*Surprise yourself and do things you didn’t think you could do — I’m always surprised at what I do that I didn’t think I could… I usually need a gentle push from loved ones..okay sometimes a shove.

*Live as if you only have one chance –We definitely only have one chance at the life we’re living now.

100_2207


2013, A Year in Review

This past year's work collage:


So, what *did* I do last year?  And, did I meet my resolutions from 2013? Let me revisit my resolutions, and let's see how faithful I was to them...
"And, my 2013 New Years Resolutions...knitting- publish a few more patterns, learn brioche knitting. Crochet - do a bit more of it. Sewing- sew a pair of perfectly fitting jeans/trousers, drape 1 dress or outfit. Quilting- finish quilting the 2 quilts from last year and make 1 quilt. Design - learn more about WordPress to create an online shop"
Knitting - I definitely published more patterns than I was expecting: Lustig Hat and Gloves, Squishy Cabled Vest, Easy Lace Loop/Cowl, Rosita Hat and Mittens, Bow Slouch, Columbina Camisole, Tyrian Loop, and Laren Fingerless Mitts... phew!  And, two projects still aren't published... more about that in the near future.

Rosita Hat & Mittens, photo copyright Knitscene/ Harper Point
Brioche knitting - I signed up for a class, and started learning, but then forgot to finish the online course!  Oops.  Let's give that one a try again this year.

Crochet - I used it more frequently this year, and I made a few amigurumi gifts and used crochet as a border in some of my own projects.


Sewing - I did manage to create a pair of jeans that fit me really, really well!  BUT... then I grew out of them, and more on that in the near future.  I loved participating in Me Made May, and hope to do it again next year if possible.
((Confession.)) I still haven't draped anything!! I failed here.  I did start drafting skirt and bodice slopers, but definitely no draping!  ((Ugh.  Guilty feelings here.))

Quilting - I did way more quilting than I thought I could!  I learned to free-motion quilt and I finished a bed-sized brown quilt, a mini lap version,  the blue sampler quilt, a baby quilt, and a double-wedding ring quilt for a friend.


Design-  I finally got my portfolio site transferred to WordPress, but I still haven't created an online shop.  Anyone have advice on easy PDF distribution systems with templates on WP?  Also, I redesigned my crochet font StitchinCrochet(PRO), and released it!


2014...  Truth be told, I don't know what resolutions I should make.  I am anticipating some big changes in my life, and the only things I can hold onto at the moment seem very vague...

1) make some art:  get back into pen and ink, finish digital illustration commissions
2) make some things with yarn: finish hand-knit projects, use machine to stash bust
3) make some things with fabric: continue on the quilting and sewing goodness track
4) blog more efficiently and step away from the internet traps (facebook and cheesy news sites)

Happy New Year!
Cheers to the new year!

Nothing …

100_4107

Nothing.  Nada.  Zilch.

Not a thought in my head as to what to post.  Am going to restock and will be back after a short intermission….  :)

(Any suggestions on what you might like to read about would be appreciated.  Surely I haven’t run out of things to write about the Vineyard…that’s just not possible!)


New Colors!

For about the last 15 years or so, I've had the same travel watercolor set.  I had taken it with me on trips here and there and all over.  Then, without even noticing, it was gone!  I looked for it to take with me on the last couple of trips, and thought it was just misplaced.  But, after a pretty comprehensive search through the earlier part of this week, and no gold, well, I gave up the old set for lost.

I was bummed.  Really bummed.

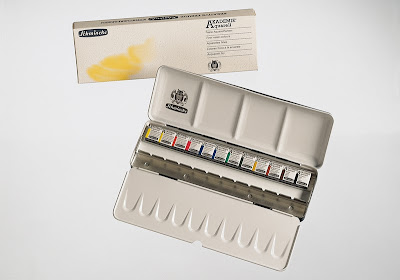
Then, I went to the art store with a friend and she went to another part of the store while I asked a shop employee for recommendations on a suitable replacement.  The set nearest to the one I lost was a bit too compact and had a water reservoir attached to it which was cool, but it was so limited in pigment pan space, that it just wasn't right.  She then showed me the set she has herself.  It's a set with 12 pans, but with space for 24 and fits a brush of regular size, too!  I was sold.  I bought two additional pans from their Horadam line - Manganese violet and a Dark red.

I don't know about you, but when I was a kid and received a new box of crayons, I tested out each color... So that's what I did here.


Yay! New watercolor set!  

Schmencke Set 75412 AKADEMIE® Aquarell, Solid metal box
with 12 half pans and space for 12 additional half pans
And, in 15 years, watercolor pans have changed a lot!  These pans are so much smoother and less grainy than before.  The pigment cakes dry way faster, too, and the colors flow much more like ink.  I'm kind of glad the old set retired itself.  Otherwise, I might never have known!


Random Rainbow

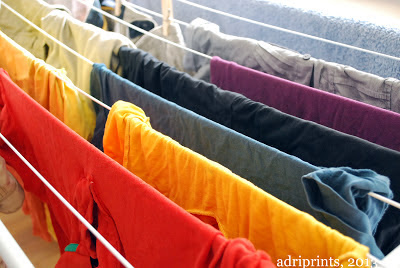
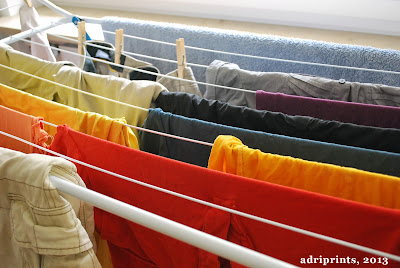
I woke up to my laundry line in the light, and I realized I had hung the clothes in a kind of rainbow color-order!

You never know where you'll find a rainbow...


Have a great week, everyone!  I'm trying to keep my head above water with the work on my plate, but hopefully soon I'll be able to share some new projects with you all.

Strawberry Picking!!


strawberry ice-cream! my favorite summer treat!

olive oil cake w/lemon and icing, perfect w/strawberries!

Does this mean summer is really here?


freaky strawberry
I hope so!  I went strawberry picking today since the fields opened earlier in the week.  I think it's true...perhaps summer really is here.  The strawberries say so, and I'd like to believe them.

I love eating fresh strawberries and making ice-cream with them.


Strawberry Ice-cream Recipe (adapted from the Ben & Jerry's Ice Cream & Dessert Book):
1 pint fresh strawberries (sliced, hulled)
1 tbsp lemon juice
1/3 C sugar

--- sweet cream base #1 (no eggs)
2 C whipping cream (I use soy cream)
3/4 C sugar
2/3 C half & half (I use soy milk)

Mash the strawberries, lemon juice, 1/3 C sugar, refrigerate, cover for 1 hr.
Then mix with sweet cream base until blended/pureed. Pour into ice-cream maker.  Let ice-cream maker do it's thing.  Enjoy!

As an alternative to the egg-less sweet cream base, you can also use this one with eggs:
--- sweet cream base #2 (with eggs)
2 eggs
3/4 C sugar
2 C heavy or whipping cream (I use soy cream)
1 C milk (I use soy milk)
prep this sweet cream base by beating the eggs until fluffy, slowly adding sugar, then the cream and milk.  You can cook this base at 160° F (71° C) stirring constantly if you want to prevent any chance of salmonella.  Let it cool completely in the fridge before adding the other ingredients and putting it into the ice-cream maker.


What do you like to make with fresh strawberries?

How We Made our Wedding Invitations (and how you can too)

Our wedding invitations all went out this week–which means a week ago Brock and I spent a lot of time putting them together. We’re throwing this wedding on a super tight budget, so every bit of money saved is a good thing. We discussed what we wanted to do a little bit, and spent a lot of time browsing etsy debating whether we should buy a downloadable, printable package or find a local artist to design them for us. We even debated making them completely from scratch ourselves. In the end we compromised a little bit. I was able to score the base of the invitations themselves in a clearance at Michael’s. Finding them was complete serendipity, but I was able to get all the stationary and stickers for the whole shebang in one day for a fraction of what you would pay a printer. Plus, we were able to include some very specific information for our guests regarding the pot-luck dinner and food allergies with no added costs.

The outside of the invitation, which, I think, was meant to be a birthday invitation, is fun and kind of quirky. The bright yellow envelop sets a cheerful mood and the elephant balancing on a ball is the perfect metaphor for putting on a wedding, but in a fun way, because he’s wearing a party hat! Plus, Circus. The inside, however, was completely blank. Stark white invitations are no fun at all, so I gathered my supplies and with a little design help from Brock, we were able to put the invitations together in one afternoon and evening.

makingtheinvitations

A little colored paper, a glue stick, some free fonts, a little time writing, and some funky scissors were all we used.

Here’s the whole experience from start to finish, just imagine the detritus of making them isn’t there.

weddinginvitationenvelope

weddinginvitations

invitation open

weddinginvitation

We glued the actual invitation into the card and included three inserts: a note concerning gifts and explaining why the wedding is gluten free, the call to action with the URL for RSVPs, and a label for whatever food dish they choose to bring listing common food allergens outside gluten so there’s no guessing and no accidental sickness.

My favorite part was probably going through the sticker book that matched the stationary. There are some creepy stickers in there.

creepy mustache sticker
What’s that all about?

So here’s what you really want to know, how much did all this cost and can you do it yourself? The cost breakdown is below and you can absolutely do this yourself.

Stationary: $15.00 (for 10 sets of 6)
Stickers: $3.00
Ticket-Edge Scissors: $1.99
Colored Paper: $15.00
Shipping Labels: $2.00 (estimate because I purchased a giant package of printable shipping labels ages ago)
Stamps: $20.70 (About 1/3 of our invitations have been hand delivered)
Fonts: Free (from here)
Design and Labor: Time

Total: $57.69*

All that, and the invitations are exactly how I want them to look. It’s pretty brilliant.

*I did not include the cost of ink in my accounting, because we have a laser printer, and the toner it takes for a job like this is negligible. However, if you are doing a project that involves color, please do not disregard the cost of printer ink.