Tag Archives: quick

Quickie Illustrations

From mid-July to this past Friday, there was a draw-along challenge kind of thing leading up to an art opening with the local Munich Artist's Group.  I dedicated a meager 15 to 20 minutes of time to these illustrations and I sadly couldn't keep up with the full 30 days.  But, I was happy to be illustrating again, and I did have a few really nice ones at the end of it.

Here is my favorite...

illustrate a place

And these were alright, too...

self portrait

favorite animal - chameleon 
a word - lackadaisical

Colette Sorbetto: Maternity Hack

During Me-Made-May 2014 I'd like to share some of the me-mades I've made recently.  For week #1 of MMM14, I've been wearing this particular garment almost daily ((or rather, nightly))!  It's a maternity pajama based on Colette's free pattern, Sorbetto...


During this pregnancy, I've inherited so many things from friends.  One of my favorite items was a Sorbetto top I helped a friend make for her first pregnancy.  I took her measurements and devised a way to use the pattern to make her a top.  We learned that by leaving the bottom part of the pleat open, you get a lot of room for a belly.  We also added 5" of length at the waist for extra coverage.


One of the drawbacks of the first prototype, though, was that it was made out of plain cotton and so it did not allow for freedom of movement or stretch should you want to sleep in it.

So, when it was my turn, I thought about improvements that could be made to last year's prototype.  Firstly, I made the decision to try a single knit jersey.  I had a big chunk of single jersey fabric from my attempt at this "wrap dress pattern" from Burda... There was no way that dress was going to work for me, and so I was happy to chop it up for this Sorbetto Maternity PJ top.

Yes, that's my dressform with a bag of fabric scraps stuffed into a belly band
to simulate my enormous pregnant belly.  It's a little lumpy, but you get where I'm going.
I had to patch 2 pieces together for the front piece since I didn't have any pieces wide enough to trace the pleat at the front.  I once again added the 5" at the waist, and I only sewed the top 5" of the pleat down the front.

Secondly, all the edges were finished with self-fabric so they're stretchy.  This was done by cutting 1.5" strips and folding them in half, then using the serger to attach them to the edges before the shoulder and side seams were sewn.


So, if you're attempting this at home... 

Colette Patterns Sorbetto is your base pattern.
Drafting: Add 5" length to the waist of front and back piece (or more if desired).
Cut 4 strips of 1.25" self fabric or knit rib with max stretch going with the long edge: 1x strip @ 2" longer than the front neck circumference,  1x strip @ 2" longer than back neck, 2x @ 2" longer than the total armhole circumference.
  1. Make bust darts as written
  2. Sew only top 5" of pleat, stay stitch pleat at neck edge
  3. Attach edging to front and back neck edges (fold edging strip in half, 3 raw edges together, serge)
  4. Sew shoulders
  5. Attach edging to armholes
  6. Sew side seams
  7. Turn up hem, press
  8. Twin needle finish for neck edge and hem, single needle top stitch for armholes 

And that's pretty much it!  You can stabilize the shoulders if you want, but mine is a pajama so I don't really care, and it hasn't rippled even after washing.  The front neck edge could be tighter if I had used ribbed knit fabric.  And, that's it for now!

Zip Pouches and Boxed Corner Tutorial

Finished up two more zip pouches with the over-locker, and now feel like I've mastered boxed corners.


As you can see, the size of the boxed corner makes a difference in the depth of the box.  When I take out just 1.5" I end up with a shallower (3" high), longer box as you see on the left.  When each corner is 2", the height of the box is 4"; creating a taller, deeper box like the one on the right.

I was learning overlocker techniques from Amy Alan's Beginning Serging class over at Craftsy, and I wasn't finding too much success with the "pinch and sew" method of boxing corners.  I tried it several times, and the result was last week's slightly wonky zip pouch.  This time, I tried another technique - a cut-out method - and found success!

How did I do it, you ask?  I'll show you!

First, I measured and marked a square on each corner of the pre-prepped zip pouch.  The square you mark does not count the previously overlocked seam.  And, the sides of the square = half the eventual height of the zip pouch.


If you look closely at the above photo, I secure the layers of fabric so they don't shift when I cut through all the layers.  I use my tailor's shears to do the cutting since it grips while cutting, and doesn't over-cut at the corner like my roll-cutter sometimes does.


 Mark the edge.


Cut out the corner using your favorite grippy cutting tool.


Use a pin to help secure the layers of fabric at the corner and mark the future center of the seam.  Pinch the fabric...


...and now you can line up your mark and pin with the center of the seam that goes across the zip.


Then, secure all the layers with pins, but remove that first pin that was marking the center so you don't run over it with your serger blade.  That would be chaos.  Those secondary pins should be far enough away that you avoid the blade of your serger, too.


Run the pinned seams through the serger and voila! Two boxed corners that are parallel, perpendicular, and totally symmetrical.


Whooo hooo!  A non-wonky zip pouch for your eyes to feast upon!

Correspondence

I think the guy at the corner post office knows my name now-- which is great!  That means I've finally finished and mailed all the stuff that should have been sent out ages ago.

You already saw the finished baby blankets in the previous post, but I also finished a few other things!  A friend and I are doing a hand-lettered mail exchange.  Here's my letter to her:


Sorry, I know her address is covered, but underneath it's lettered really nicely. I wanted to respect her privacy, you know?

I also did this hand-made facebook exchange thing and I finally got around to making the items!

First, there's a hand illustrated postcard to a friend of mine.  It's an inside joke, but for the life of me, I can't remember the punchline.  All I remember is that many moons ago, I made my friend, VJ, a silkscreen t-shirt with the word "beefmaster" on it and a piece of toast.  Here's the concept revisited:


Then, there are the eye-glass cases I made from quilting scraps for two friends of mine who live in sunnier locations:


They were made using a simple cardboard template that measured 9" x 5" and then quilted and sewn together.  Is anyone interested in a tutorial?  Let me know in the comments if you are.

And finally, in the mail I got my contributor's copy of KnitNow's Issue #30 with my pattern on the cover! 


What a crazy awesome issue!  It has so many lovely extras like charts for colorwork lettering and magnet strips to keep track of charts.  Very handy!  And a lovely insert with cute winter accessories.  This issue has lots of quick knits at various skill levels, and it's chock full of knitted lovelies in general.  I feel so lucky to have been a part of the gang for Issue #30!

New Colors!

For about the last 15 years or so, I've had the same travel watercolor set.  I had taken it with me on trips here and there and all over.  Then, without even noticing, it was gone!  I looked for it to take with me on the last couple of trips, and thought it was just misplaced.  But, after a pretty comprehensive search through the earlier part of this week, and no gold, well, I gave up the old set for lost.

I was bummed.  Really bummed.

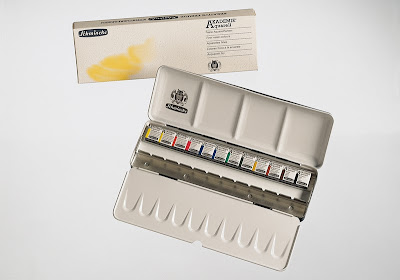
Then, I went to the art store with a friend and she went to another part of the store while I asked a shop employee for recommendations on a suitable replacement.  The set nearest to the one I lost was a bit too compact and had a water reservoir attached to it which was cool, but it was so limited in pigment pan space, that it just wasn't right.  She then showed me the set she has herself.  It's a set with 12 pans, but with space for 24 and fits a brush of regular size, too!  I was sold.  I bought two additional pans from their Horadam line - Manganese violet and a Dark red.

I don't know about you, but when I was a kid and received a new box of crayons, I tested out each color... So that's what I did here.


Yay! New watercolor set!  

Schmencke Set 75412 AKADEMIE® Aquarell, Solid metal box
with 12 half pans and space for 12 additional half pans
And, in 15 years, watercolor pans have changed a lot!  These pans are so much smoother and less grainy than before.  The pigment cakes dry way faster, too, and the colors flow much more like ink.  I'm kind of glad the old set retired itself.  Otherwise, I might never have known!


Rosita Mittens & Hat, Bow Slouch Hat revealed

This month on newsstands or at your local yarn store, you may see this magazine...


Inside, though, there are three of my designs!  I can finally reveal them since they're officially out in the open.
These three designs mark my first official printed-in-a-magazine knitwear designs. I'm super excited about them!

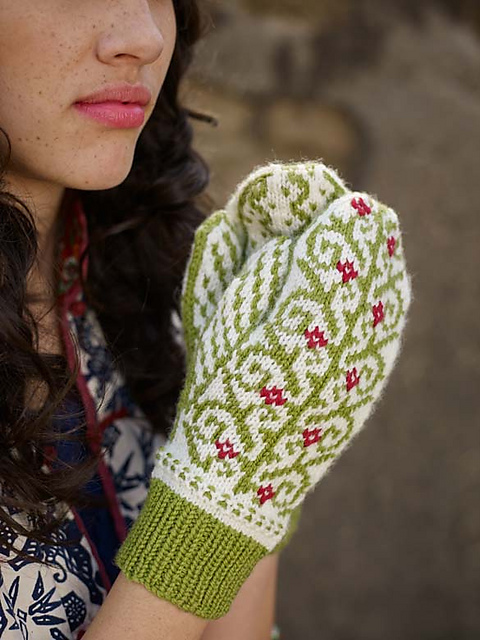
Firstly, there's the Rosita Hat & Mittens set.  The Rosita Hat & Mittens were inspired by the beautiful embroidered motifs on the traditional dresses of the Yucatan.

my inspiration
The mittens are knit in the round from the cuff to the fingers using stranded colorwork. Duplicate stitch is used to embellish the main mitten with flowers to finish the look!
photo property of Knitscene/Harper Point
The hat is made in a simpler way and uses a nice dots and dashes pattern to provide a bit of contrasting color.  The brim also looks nice folded up.

photo property of Knitscene/Harper Point
Here's me modeling the hat two different ways...


The third design in this issue of Knitscene Accessories is the Bow Slouch.  This is an easy pattern with a twist.  The brim is actually folded up and doubled for a nice, snug fit.  It can stay on even when worn at the jauntiest of angles!  This yarn, Accordion, is awesome.  It's so soft and knits up beautifully.  I never thought I'd be a fan of a mohair blend, but here it is folks.  I loved it.  And even made up a second hat for my mom.  Hers has a more modest bow, though.  I only wish I had more of this yarn to make up a third sample for myself!

photo property of Knitscene/Harper Point


And there you have it!  One of my big secrets I've had to keep under wraps since last year!
If you are interested in the magazine, you can find more details here:
http://www.interweavestore.com/knitscene-accessories-2013

Quick Gifts 5: Easy Lace Loop & Cowl Set

It's finally published!  I just wanted to make sure you knew in case you wanted a quick weekend project.

Recently I've been trying to tie up long-time loose ends and this is one of them.  A few years ago several of our local SnB members (myself included) purchased these beautiful variegated skeins of Malabrigo Silky Merino.  A few years passed, and we still had no idea what to make with them.  Each is so different from the other, and each is beautiful in its own way.  So, after fiddling with  many many stitch patterns and needle sizes, I finally came up with a good combination of yarn, needle size/gauge, and pattern!

Here's what resulted from the effort:


I'm quite happy with the results, and if you'd like to try your hand at the pattern, it's available here on Ravelry.  It makes a really quick knit in the DK weight, and different yarns react differently to the pattern.  Some pool others stripe, but I'm happy with the end results of both combinations.

Details on the pattern...
The pattern is for 2 sizes: Cowl and Loop. 

Instructions are given for 2 yarn weights: DK and Fingering.  It’s a great pattern for stash-busting and using up variegated yarns.
SIZES 
DK/8ply 
Cowl: ~24-26” / 61-66 cm circumference 
Loop: ~44-48” / 112-122 cm circumference 
Fingering/4ply 
Cowl: ~22” / 61 cm circumference 
Loop: ~44” / 112 cm circumference
All have height ~10.5” / 26.5 cm
SKILLS 
• knitting in the round 
• slipping a stitch, dropping a stitch 
• passing a slipped stitch over live stitches 
• yarning over
MATERIALS 
DK/8ply Yarn 
Cowl – 150 yds / 137 m DK/8 ply yarn 
Loop – 300 yds / 274 m DK/8 ply yarn 
Fingering/4ply Yarn 
Cowl – 275 yds / 229 m Fingering weight / 4ply yarn 
Loop – 550 yds / 457 m Fingering weight / 4ply yarn
NOTIONS 
1 stitch marker, tapestry needle

Iris Pullover


I'm glad to finally be sewing again!  Here's a quick project I made in the in-between times.  Knitwear design is still taking the priority spot on my agenda, but hopefully I'll have some pretty samples to show for it in the near future!

In the meantime, here's the Iris Pullover from Schnittchen® - einfach nähe...
Schnittchen's downloadable patterns are much in the style of Burda and Knipmode in that you print out a large sheet with multiple sizes, and then you mark and trace just your size.  The patterns are unlike Burda/Knipmode in that they actually include seam allowances!  Woot!

For this kind of oversized garment it was nice to have the seam allowances already done... makes for quick, quick, quick sewing when it's just ~1/4" seam allowance (width of a sewing foot) and go go go!  It took me just a few hours to sew, and you don't need an overlocker (though it would make things even faster!) just a straight stitch and a zig-zag stitch.

So here it is!  My Iris Pullover...

This jersey knit fabric was lovely to work with albeit on the thin side.  I am definitely going to make another one when I can get my hands on some sweatshirt fabric at a reasonable price.  Suggestions are welcome for sweatshirt fabric resources in the EU!

The Facts
Fabric: 1.5m x 1.5m striped knit jersey from TST-Stoffen (at Stoffmarkt Holland fabric market)
Pattern: Iris Pullover from Schnittchen (has link to photo instructions)
Also, check out some of the free patterns on the site here.
Year: 2012?
Notions: none
Time to complete: 4 hours
First worn: Nov. 16, 2012
Wear again?  YES, I love it.  It's really comfy.
Total price: 5 EUR for the fabric

I love the way this pattern turned out.  I love the over-long sleeves so I can hide my hands inside the cuffs, and the long body so it covers everything.

Possible Mods for next time
It's too bad I didn't have a little more of the fabric, otherwise I'd have made it with the hoodie.  (Instead, with the little extra I had left, I'll be making some undies.)
I think I may also include a thumb gusset so I can stick my thumbs in the cuff and use the cuffs like pseudo-gloves.  Why not?


Overall Review
The Iris Pullover pattern is do-able for beginners with a machine that has a zigzag and a straight stitch.  Only special tool needed was a needle for elastics.  I used a Schmetz Stretch 75/11 needle.
Happy Sewing!

Tutorial: DIY Pompom

New Knit Pattern: Amaranth Headband