Tag Archives: tutorial

My first online class!

About My First Class on Skillshare

My first class is about learning to use Adobe InDesign (which already comes bundled with many Adobe CC accounts) to make beautiful, clean, perfectly aligned contact sheets that are easily edited, updated, and exported to help you sell your work.
I created this course to help de-mystify InDesign. A lot of creatives, artists, and photographers pay for Adobe CC, but are not sure how to take advantage of all the software it brings. So, this is my effort in making Adobe's publishing software work for you. InDesign is a really robust piece of software and the perfect companion for Illustrator and Photoshop when you're looking to put it all together and publish your work.

I created this course to help de-mystify InDesign.
I've used InDesign to produce all kinds of promotional and informational materials throughout the years: business cards, mailers, postcards, booklets, portfolios, and contact sheets.
I focused on contact sheets as a way to explore InDesign and learn concepts that will easily translate to a lot of other projects. If you'd like to learn more, you can check out the class here on Skillshare.
I'd love to hear what you think!! And, if you've never used Skillshare before, here's a link for a  free 2 month trial of their premium membership - the link's limited to the first 10 who use it though, but take advantage while you can!

Make Mine a Mini, Workflow

Previously, I posted this animated short featuring my illustrations.  In this post, I wanted to share my workflow in After Effects so that I could easily reference what I did, what I learned, and what I think could improve in my workflow moving forward.  This post is also to help my illustration friends who might want to try it, too!

Workflow #1
for the first half of the short
the "overwhelm" sequence

1. Complete final sketch for placement of all items

2. I used a light table to illustrate various elements of the final image in pen & ink individually (so they're not touching or overlapping).


Inked text and brain for final animation.
3- Scan and make a vector composition (placement of all assets/icons) use sketch for reference.

NOTE: Everything that you want to animate individually, needs to be on its own layer (head vs. top of head in my case) and use an artboard that is the size of your final screen to help with proportion.  You don't wanna draw in After Effects.  It's clumsy, and on my computer it's so huge it time-lags to do anything.

4- Bring illustrated assets into project panel of After Effects (file> Import, x-retain layer size> Import)
5- Make a new composition (ctrl+n) at the desired length and specs.
6- Drag your file from the project panel to the timeline area.
7- Convert your file from vector to shape layer (right-click layer in timeline> convert to shape layer)

NOTE: This will explode into 200+ layers in After Effects if you're a rough-line illustrator like me. It's okay.  We will get through this.  If you're a super-clean vector illustrator it's even easier-- also maybe look at Flash as a simpler solution than AE.

8- Carefully separate layers into groups (took a long time with such tiny pieces in my artwork).
9- Then form groups into Pre-Comps (mini animation canvases).  Assign the anchor point to the right part of each element (Y).  Make sure all elements are where you want them to be at the end.
10- ANIMATE!


Tips on Animation
  • Let your storyboard be your guide.
  • Work backward from your storyboard key images.
  • I think about the biggest movements and mark where I want those actions to hit on the timeline using the markers.
  • It's easier if you already have music to match the movement.
  • Then, I work between the markers.  I go through each pre-comp to animate each item individually, then as a group, and lastly, each section until satisfied.
  • To export hit Ctrl+m to render queue and click"render".
  • Lastly, I put the rendered clips together in MovieMaker... You do not want to do any real editing in MovieMaker so be sure your clip is the approximate right length, your transition in and out is the way you want it to look, and that your text is the correct size. Windows Movie Maker is really easy to use, but you cannot control details very well.


Workflow #2
for the second half of the short
the "ibis hideaway" sequence (as shown above)

1- Used my final pattern "Ibis Hideaway" as layout for my final composition
2- separated each layer (30+) into .png files with transparency exported from Illustrator

Note: I preserved the artboard size for each item.  I thought this would help with placement in AE and it did, but it makes anchor points really critical and you can't use the shotcut "ctrl+alt+home" to automatically center the anchor point for each object b/c it's the size of the artboard. Plus it's annoying to select items when you do this.  But, I did like that it created a more manageable series of layers and pre-comps.

See what I mean about preserving the artboard?

3- In AE, import files into the Project Panel and make a new composition.
4- Drag your files from the project panel to the timeline area.

5- Form layers into groups (took a long time with such tiny pieces in my artwork).
6- Then form groups into Pre-Comps (mini animation canvases).  Assign the anchor point to the right part of each element (Y).  Make sure all elements are where you want them to be at the end.
7- ANIMATE!

- - - -
I asked Jake Bartlett of the "Animating With Ease" Skillshare Class about his workflow after he's done animating, and here's what he had to say:
...I use Adobe Premiere for all of my editing needs. It works wonderfully with all of the other Adobe products and is extremely robust. For still titles, I use the built in title maker, and for anything animated or more designed, I'll use AE or Illustrator. The workflow depends on the project, but if I'm animating to music or a VO track I typically will edit the audio first in Premiere, and then copy and paste the audio clips directly from my Premiere sequence into a composition in After Effects. That way I have the audio reference inside AE while I'm animating. Hope that helps!
Thoughts, Questions, etc.

Moving forward, I liked the simplicity of the second workflow.  Pre-grouping the elements that I knew were not going to need individual animation saved me a lot of time.  It sacrificed control, and in some cases visual quality - one of the butterflies came in pixelated and I don't know why. I must not have used the same settings as with the other .png files.

If I do a character or puppet animation I would need to export each element of the figure as a transparent .png illustrated in either PS or AI.  I think it could work, and then I'd use the anchor points like the hinges we made in paper animation!  So excited.

If you know of a better way to get raster or complex vector images into AE, or if I glaringly forgot or missed something, please do not hesitate to e-mail or comment and let me know.  I'm just getting into AE and would love to use my time as efficiently as possible so any advice is welcomed!

3 Hours Past’s Blank Canvas Tee: Maternity Hack

During Me-Made-May 2014 I'd like to share some of the me-mades I've made in more detail.  In order to see if I could replicate a maternity/breastfeeding top that I love, I tried my hand at drafting and here are the results!


If you're just starting out sewing with knits, a great place to start is a simple dolman sleeved t-shirt like the Blank Canvas Tee from 3 Hours Past the Edge of the World's Blog.  If you're past that, are ready to try some drafting, and would like to make yourself a breastfeeding or maternity top, then this is the mod for you!

Start with the Blank Canvas Tee from 3 Hours Past...

Added Materials

  • additional fabric because the length of the T-shirt is extended.
  • 1 piece of elastic - soft baby elastic or elastic about 1/4" wide that suits your fancy in the width of your t-shirt + 2" or so.

Extra Skills

  • sewing with elastic

Special Tools

  • twin needle
  • stretch needle 75/11  (a whaah?  Here's a needle guide from Schmetz)
  • pencil and ruler
  • maybe tracing paper if you don't want to write on your pattern
Inspiration: From boob design, this short sleeve maternity/nursing top is one of my faves.  It fits really well and the split top allows for belly room.


Okay.  Ready to make your own?
First print and assemble your pattern pieces from 3 Hours Past... Then, here's our goal: we want to create two pieces for the front that overlap by around 5" / 13cm for the smaller sizes.  You'll likely need a bit more overlap for the larger sizes or if you usually find yourself doing large bust adjustments.

The goals.
Measure from just below the armpit curve to your goal overlap length, then add 1" / 2.5 cm so you have enough to turn up a hem.  Trace what you have onto your fabric, or onto tracing paper to make pattern pieces.  I've highlighted what I did to the pattern in the photo below.


See the red highlight?  That's the top front piece.  The blue highlight shows where the the bottom front piece would be.  For the bottom, I took the design line straight up and did not taper in like the pattern - it's housing a big belly at the moment, and I thought it would be advantageous to have a little leeway.

The other change I made here was adding length.  Add what you will.  My goal was to have a t-shirt around 28" so I added a few inches to the bottom of both the back and front bottom pieces to achieve that.  I just followed the design lines to my goal length. To calculate length, I measured from the peak of the shoulder, parallel to the fold line.

Alright, you've traced and cut your 3 pattern pieces.  Do you have your edging pieces (no change from pattern) cut, too?  And those two strips of interfacing for the shoulders?  What interfacing? I used Vlieseline G785 since it's stretchy, lightweight, and works with knits. Everything cut? Great! Let's get these pieces ready to put together.

Assembly:

  1. Step 2 from pattern: Iron on interfacing to WS of back piece shoulder edges
  2. Front top piece - finish bottom edge with zig zag stitch or serge, turn up and twin needle the hem from the right side
  3. Front bottom piece - add elastic to top RS edge using a triple zig-zag stitch.  How?  I simultaneously slightly stretch the elastic while guiding the main fabric under the presser foot.  I do not stretch the main fabric.  Right hand for elastic, left hand for guiding fabric.  I do this 2" at a time so I don't lose my nerve.  Then, I fold over the elastic so I only see the final fabric, and straight stitch the bottom edge of the elastic.
  4. Overlap the two front pieces- With RS facing you, make sure the front top is on top, and the front bottom is behind it.  Make sure the overlap is what you desire and pin.  Stay stitch within the seam allowances (so ~1/8" from the edge) to secure the overlap.
  5. Step 3 to 9 are the same as the original pattern.
And there you have it!  You've made a maternity/breastfeeding t-shirt!  Feel free to change the neckline and make it a scoop neck like in the inspiration photo.  I like crew necks so I kept the pattern as is.  But, I think I'm going to try and make a tank or sleeveless v-neck.  We shall see!

Tutorial: Zig-Zag Quilt

You can make your own Zig-Zag Quilt top from stash scraps, and it's not too difficult!

Main requirement for piecing this quilt top:
72 white pieces of fabric, 4.5" square
72 print pieces of fabric, 4.5" square

You'll also need:
- additional yardage for sashing, backing, and binding
- batting for the center of the quilt sandwich

Side Note: Someone asked me how I get the fabric for my stash and how I chose the colors for this quilt.  My stash was built up from fat-quarters and yardage for garment sewing.  I am a bit compulsive after sewing projects.  I can't remember where I got the idea to save scraps larger than 2" square after sewing projects.  But, that's what I do. After a project, I cut down the smaller bits of fabric into two categories: strips or squares.  I trim the squares to be 4.5" because that's the size of my plastic template.  And the smaller stuff gets turned into strips or dresden plates.  Then, I have little clear plastic bags where these scraps are organized by color.  Obsessive yes, but hey, it made this project a real snap!


First, the basis of this quilt is the half-square triangle.  It's known in the quilting world as the HST.  After you've mastered that, you're pretty much set to go.  Here's how I did the HSTs for this quilt...


As described above, I started with two fabric squares in contrasting colors of identical size.  In the case of the Zig-Zag Quilt, I started with squares that measured 4.5".  As long as all your squares are consistently cut and pieced, it's all good.  Each pairing makes 2 HSTs.  You lay one white, one color square with right sides together.  Mark the diagonal, and stitch 1/4" above and below the mark.  Then, cut across the diagonal mark, open, and press the two squares you just made.  I do loads of squares at a time by chain piecing and then press them all at once... I learned this from Craftsy's 2012 Block of the Month with Amy Gibson - the February video here is all about the HST.

Once you've made a bunch of these HSTs, they can be combined in so many different ways!


In the case of the Zig-Zag Quilt, here's how I pieced the top:


Each row of zig-zags used 24 HSTs.
The final quilt had 6 lines of zig-zags, which equals 144 HSTs.
This also means that I started with a total of 144 squares of fabric: 72 color and 72 white squares.

In any case, once I had the long pieced rows of zig-zags, I carefully joined them across these rows, making sure to use pins to line up all the seams.  I tend to press my seams open, and this was no exception.


Next, I added sashing to the outer edge of the top (that white outer frame).  My sashing had extra width to it.  If I remember correctly, the sashing was 6" wide so I could trim it down if I had to square up the quilt after free-motion quilting.  I didn't end up FMQing, but it's always good to have a bit of wiggle room for squaring up.

You cut your batting (the fluffy middle) about 4" longer and wider than your top so you have 2" of adjustment... just in case!

For me, the trickiest part of this quilt was the backing.  If you have a really vertical/horizontal element on the back like in my version of the quilt, you want to be sure to hand-baste a few cross-hairs across the quilt so it's accurately aligned to the front.  I ran a line of basting down the center of the big vertical element, and across both the horizontal elements.  This help me to be sure it was oriented correctly to the quilt top. If you want to avoid this extra step, just use a non-directional print, and a whole cloth style for the back.


My first quilts lacked this kind of precision (and were really wonky) because I didn't understand how important basting was.  Once you learn to hand-baste quickly, there's no excuse! It takes a few minutes for a quilt of this size.  I did both pin and hand-basting for this quilt.

Lastly, is the actual quilting.  First, I stitched in the ditch (along the main zig-zags).  Then, I echo-quilted which means I ran a line of stitching about 3/8" away from the zig-zags.  I just used my presser foot's width as a guide.  Then, I quilted the sashing, added the binding (that final outer edge) using this tutorial from Sew Mama Sew and Mary on Lake Pulaski.

And, that was it!

The final quilt including the sashing and binding is 51" x 51".
The main print for the backing is Tula Pink's "Turtle Bay" print from her 2011 collection "Prince Charming" in Indigo.  Everything else was scraps and leftovers from my stash.

I hope this tutorial helps clarify the process of quilting something like this improvised quilt.  Have you ever quilted before?  What were your first quilts like?

MK Tutorial: Mitered Detail with Short Rows


This tutorial is a machine knitting tutorial that leads up to the publishing of my pattern, "Mitered Detail Cardigan."  The mitered detail in the pattern can be accomplished in two ways.  The first way described in the pattern, is with short rows (also known as partial knitting) and by wrapping each stitch as they are put on hold.  In order to best show what I mean, I made a video tutorial for this one...


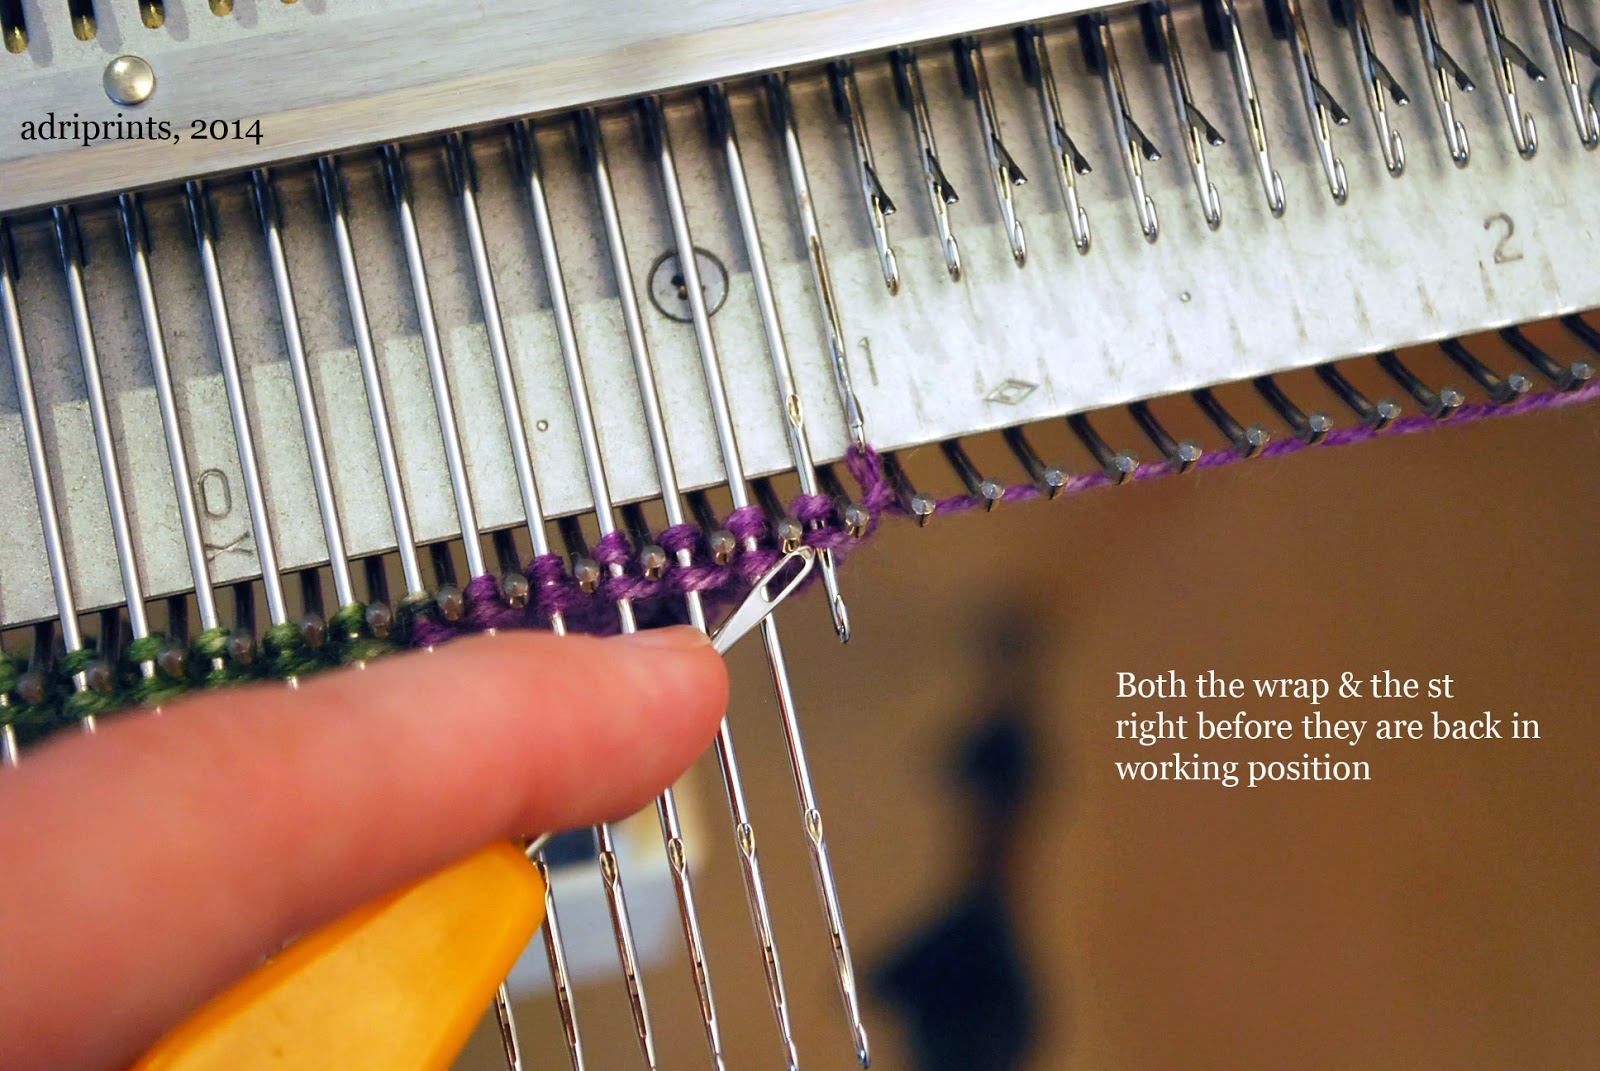
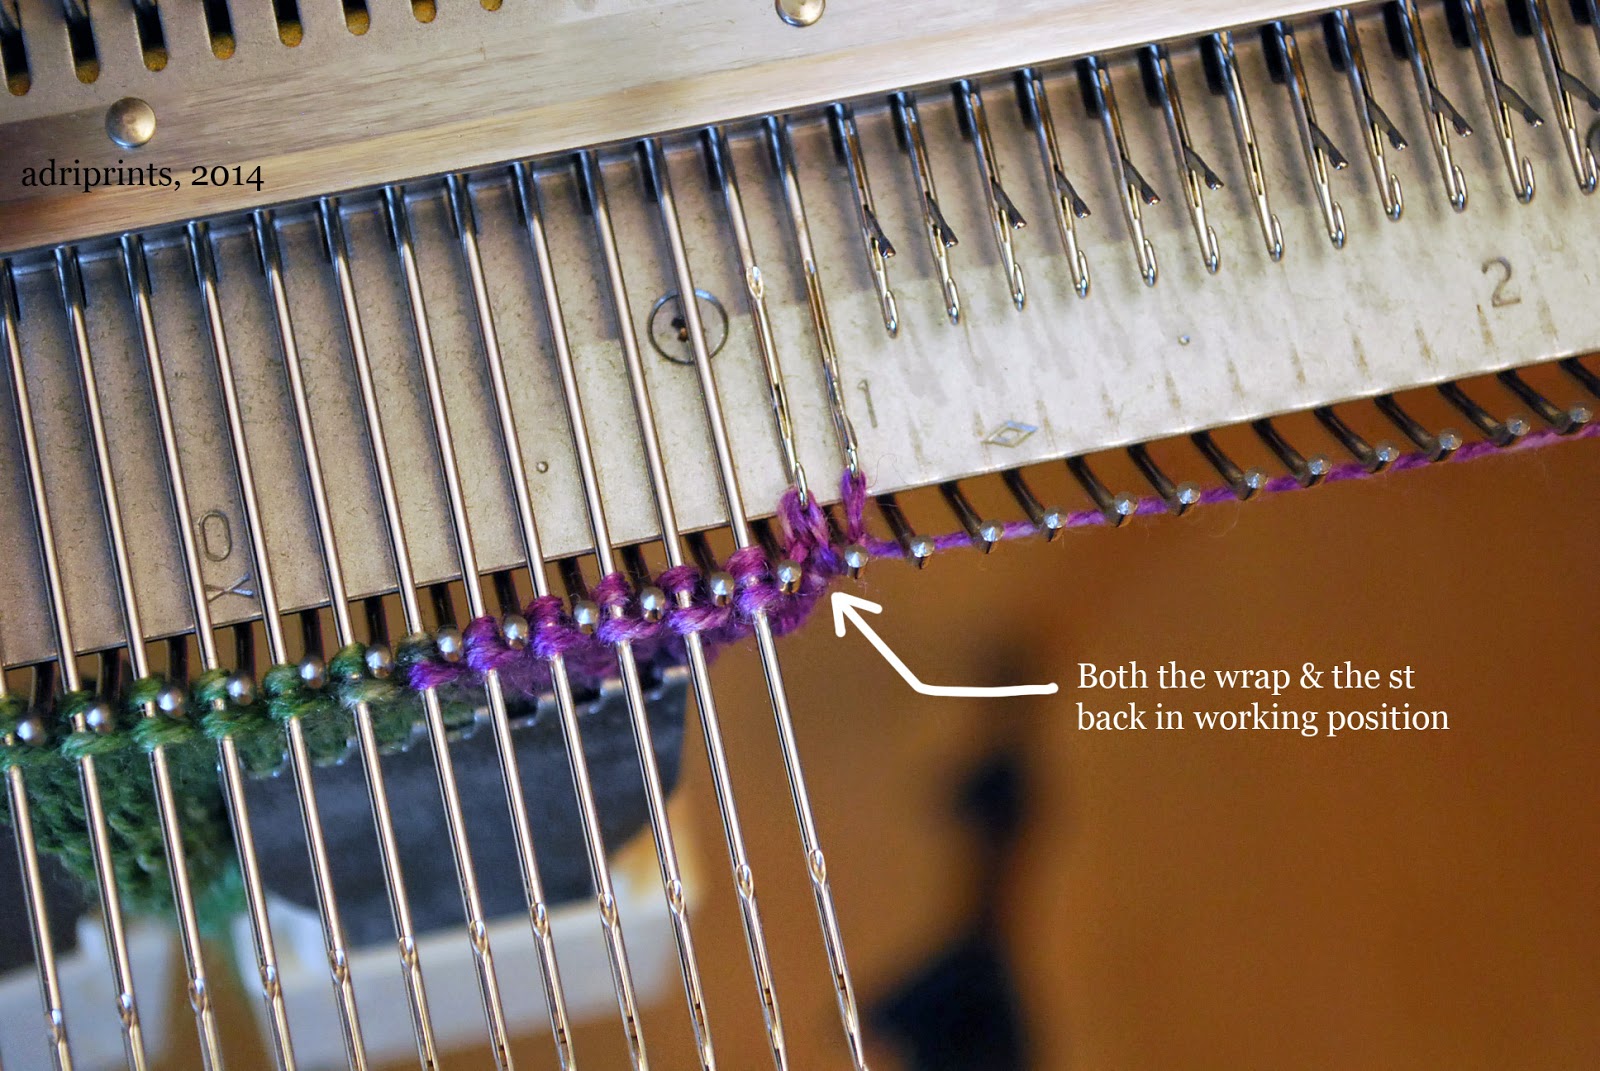
Just in case it's too blurry in the video, here are detailed photos of what it looks like to "reactivate" a stitch into working position.

Wrap & stitch back in the hook part of the needle.

Wrap & stitch ready in working position ready to knit.

Here's a mini sample showing the detail on the front and back.  I think the color pooling of the yarn helps show the order in which things were knit.  The green section happened first, then the purple.  With WS (wrong side - in this case the purl side) facing, this block was worked from left to right.


MK Tutorial: The Garter Bar

Ah yes, today we learn a little bit about the garter bar- that tool which gave me nightmares until it made my knitting machine dreams come true!

I have an old-fashioned garter bar that I purchased on e-bay a few months back after not realizing that there was a difference between transfer combs and garter bars.  You live, you learn. This kit is a couple of decades old, but is in pristine condition.  Sadly, it came with sparse instructions in Japanese and German.  I do speak and read German, but the technical nature of the writing made it a bit tough.  So, after a bit of internet researching, deciphering the 1970's mimeographed illustrations and instructions, and a bit of trial and error, I photographed my process to share with you all.  It's also here to remind me how to use it in case I need a mental refresher.  Here goes...


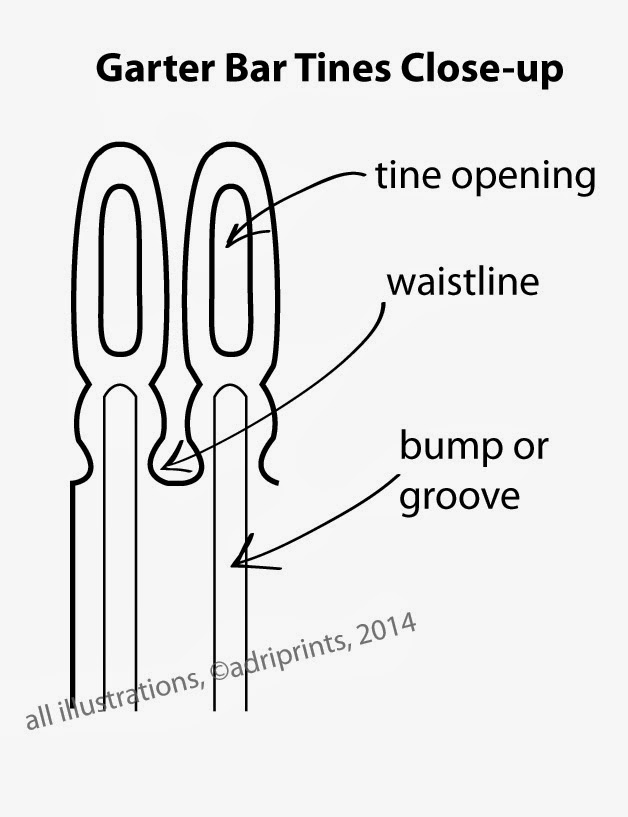
Note: I'm using an Empisal Knitmaster 324 and a Brother Garter Bar so the conventions of my machine and garter bar may not be the same for yours.  I've used terms that make sense to me to describe parts of the garter bar, but they are not official terminology by any means.

The garter bar has two sides: one side has all bumps, the other side has all grooves.

1. Place working needles in D position with sts past the needle bed's sinker posts.  Place the needle stop over the working needles, over the sinker posts, but behind the sts of the work. Open all the latches of the working needles.  Place the garter bar onto the needle hooks with the groove/ditch side up


2. Lift the garter bar so it's parallel with the working needles.


3. Use the live sts to close each needle's latch over each garter bar tine.


4.  Slide the live sts over the garter bar tines, past the "waist line" of each tine.


5. Release the yarn from the carriage, and use a clothespin to secure it to the garter bar.
Set the carriage so the Russel Levers do NOT knit the needles in D position.
Remove the claw weights from the work, and then remove the garter bar from the needles with live sts still attached.
Next, remove the needle stop from the needle bed and push the carriage to the opposite side. Breathe.


7. Replace the needle stop over the working needles.  Turn the garter bar bump side up with the knitting work on top.


8. Open all the latches.  Make sure the garter bar is parallel with the working needles, and place the openings of each tine over the latches.  Remove clothespin. All the sts must be as far from the tine openings as possible (behind the waistline of each tine) before you proceed.


9. Push down gently on the garter bar, and slide it toward you.  Keep the garter bar as even with the needles as possible.  Here's the magical part... Each needle's hook should catch the underside of a single stitch.


Check the needles from above.  Every needle has a stitch?  Yay!  You're ready to move on!


10.  Replace the yarn in the carriage.  Remove the garter bar. Remove the needle guard.  Push the sts back into working position. Replace the weights on your knitting and knit 1 row in garter stitch!


Phew!  You did it!


Rinse and repeat as necessary.

Zip Pouches and Boxed Corner Tutorial

Finished up two more zip pouches with the over-locker, and now feel like I've mastered boxed corners.


As you can see, the size of the boxed corner makes a difference in the depth of the box.  When I take out just 1.5" I end up with a shallower (3" high), longer box as you see on the left.  When each corner is 2", the height of the box is 4"; creating a taller, deeper box like the one on the right.

I was learning overlocker techniques from Amy Alan's Beginning Serging class over at Craftsy, and I wasn't finding too much success with the "pinch and sew" method of boxing corners.  I tried it several times, and the result was last week's slightly wonky zip pouch.  This time, I tried another technique - a cut-out method - and found success!

How did I do it, you ask?  I'll show you!

First, I measured and marked a square on each corner of the pre-prepped zip pouch.  The square you mark does not count the previously overlocked seam.  And, the sides of the square = half the eventual height of the zip pouch.


If you look closely at the above photo, I secure the layers of fabric so they don't shift when I cut through all the layers.  I use my tailor's shears to do the cutting since it grips while cutting, and doesn't over-cut at the corner like my roll-cutter sometimes does.


 Mark the edge.


Cut out the corner using your favorite grippy cutting tool.


Use a pin to help secure the layers of fabric at the corner and mark the future center of the seam.  Pinch the fabric...


...and now you can line up your mark and pin with the center of the seam that goes across the zip.


Then, secure all the layers with pins, but remove that first pin that was marking the center so you don't run over it with your serger blade.  That would be chaos.  Those secondary pins should be far enough away that you avoid the blade of your serger, too.


Run the pinned seams through the serger and voila! Two boxed corners that are parallel, perpendicular, and totally symmetrical.


Whooo hooo!  A non-wonky zip pouch for your eyes to feast upon!

Tutorial: A Quick Dye Job


A couple of years ago, I asked a friend of mine who is a professional yarn-dyer how she dyed one of her colorways into a gradient.  I just couldn't imagine controlling the flow of color using the tradition ways of dyeing skeins.  So, she told me.  She doesn't dye the yarn in the skein, she dyes it while it's knitted up like a blanket.

((brainpop))

Materials:

  • 100g skein of yarn meant for dyeing (or natural fiber yarn that can be over-dyed) knitted into a blanket or scarf (a knitting machine makes this faster)
  • gloves
  • kettle to quickly boil water and mix colors
  • Kool-Aid packets (5 to 15 depending on color intensity - this tutorial used 5 plus a pinch of a 6th pack)
  • a microwave
  • plastic bag or surface protector
  • microwave-safe bowl big enough to hold knitted blank
  • jars to mix Kool-Aid (how many depends on how many colors you want to mix)
  • yarn swift

Using a vague version of her technique, I used the knitting machine to knit up one skein of yarn into a kind of blanket or wide scarf.

1 skein of Knit Picks Bare
Then, I soaked it in warm water while I mixed the Kool-Aid colors.  I used 6 small packets of Kool-Aid, and the yarn color is still quite light.


Kool-Aid "Recipes"

1) basic light blue = 1 pack of Ice Blue Raspberry Lemonade + 1 pack Berry Blue + a pinch of Cherry

2) darker green = three dips in the combo of 1 pack Ice Berry Blue Raspberry Lemonade + 1 pack Lemon Lime + a pinch of Cherry

3) yellow blending = 1 pack Lemonade

All colors used at least one full pack of Kool-Aid mixed in a small jar (about 1.5 Cups) of just-boiled water.


Dyeing Procedure

Once all my colors were mixed, I gently poured blue color onto blanket which was set atop a plastic bag big enough to cover my surface.  Note: I wish I’d rolled the wet blanket and dipped it into the bowl for more even coverage. Ah well!


Then, I poured some of the green dye into a bowl, and with a rolled blanketb I dipped the end of the blanket into the bowl with 1/3 green mix, then dipped again, but deeper, with 1/3 green mix, then even deeper with the last of the green mix to create a kind of gradient.

But, where there was a bit too much contrast, I added yellow, pouring directly from the jar and using my hands (in latex gloves) to kind of finger-paint the color.


Then, I cooked the blanket with enough water to slightly cover it in a Pyrex bowl in the microwave for about 3 minutes (checking on it and turning it every minute or so).

I rinsed the blanket in warm water, soaked in “Soak” then spun it dry in washing machine, and unwound gently to dry in hank-form.

after spinning it dry
winding slightly damp yarn is pretty easy

The colors came out much lighter than anticipated, but I'm still pleased with it.  If I want super-intense colors next time, then I could mix larger quantities of color (more Kool-Aid packs + more just boiled water).  But, this fairly non-toxic and relatively quick (with a knitting machine and microwave!) dyeing method appeals to me very much, and I think I will try it again in the future!


So... any ideas on what to make with the newly dyed yarn?


Winter Accessories!

Tutorial: DIY Pompom